N9H30 Buildroot Quick Start
opennuvoton N9H30 https://github.com/OpenNuvoton/MPU-Family
Start up with VMware
This VMware Image offers a Linux development environment for N9H30.
opennuvoton 的 VM 檔案 : N9H30 VMware
User Name: nuvoton
Password: user
Download and Update Buildroot
Open Terminal and path to the NUC970_Buildroot folder:
$ cd NUC970_Buildroot
Update the buildroot:
/NUC970_Buildroot$ git pull

Set configuration to the target board
$ make nuvoton_n9h30_emwin_defconfig

Build image
$ make

Building Finishing
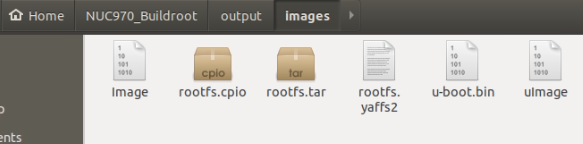
Once the build is complete, you can find the resulting image at /output/image
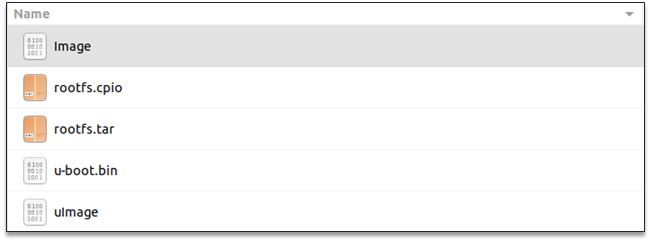
- Need the u-boot.bin and uImage files to program the N9H30 EVB through NuWriter.
-
Image: Linux kernel image used for running on DDR -
uImage: Linux kernel image used for booting with uboot -
u-boot.bin: uboot image -
u-boot-spl.bin: “uboot Secondary Program Loader image”, used for booting from SPI NAND(~/output/build/uboot-master/spl/u-boot-spl.bin)
-
If you made a minor change, you can use the following:
To configure Buildroot:
$ make menuconfig
To configure uboot:
$ make uboot-menuconfig
To configure kernel:
$ make linux-menuconfig
make
$ make –j4
Rebuild the uboot
$ make uboot-rebuild && make
Rebuild the kernel
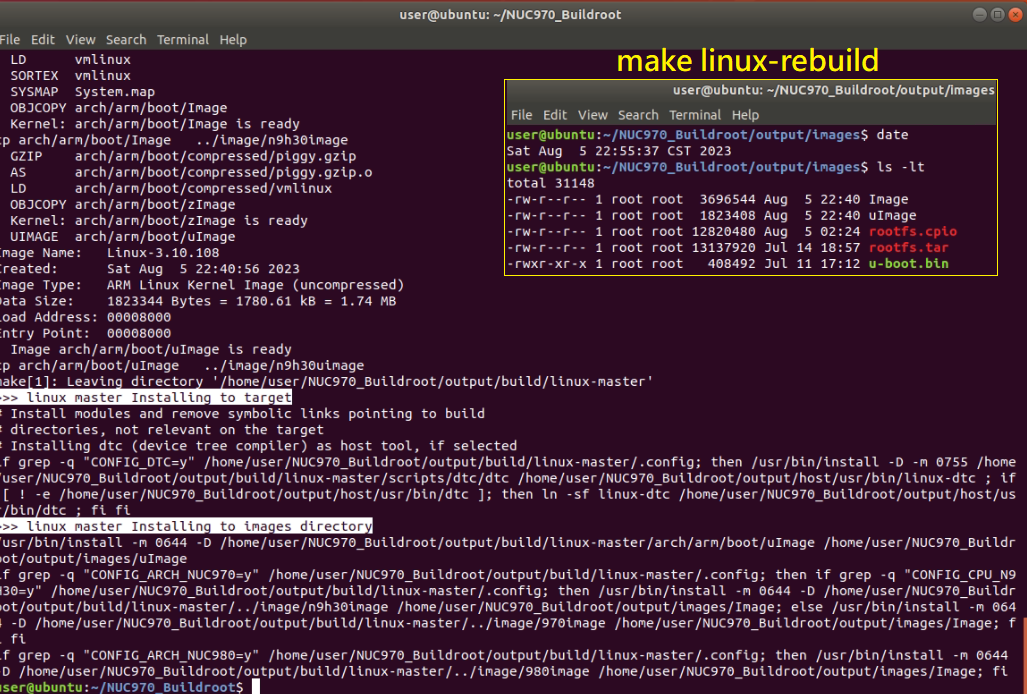
$ make linux-rebuild && make
Clean directory project (Ex)
$ make <package>-dirclean
Clean up any previously built files, you can use the following commands:
$ make clean
Programming
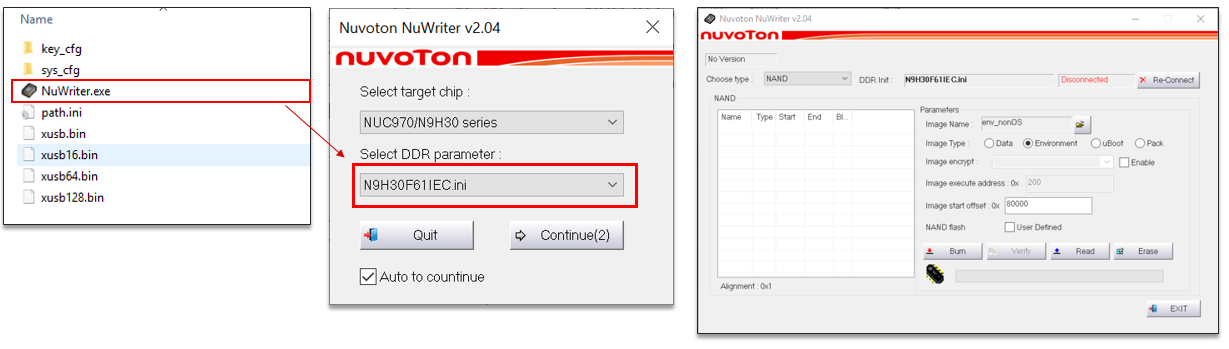
Usually, you would use NuWriter for N9H30 to program the image.
Install WinUSB4NuVCOM Driver
Open NUC970_NuWriter-master\NuWriter\NuWriter\Release
Select the corresponding IC model. N9H30F61IEC.ini
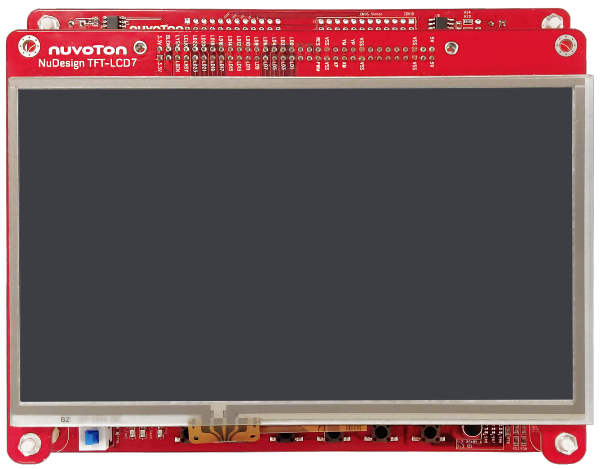
Evaluation Board Introduction
- Debug Port (console): show the debug message
- USB Device: used to program image by NuWriter
- Power-On Switch: Switch booting source
- Reset Button: reset N9H30
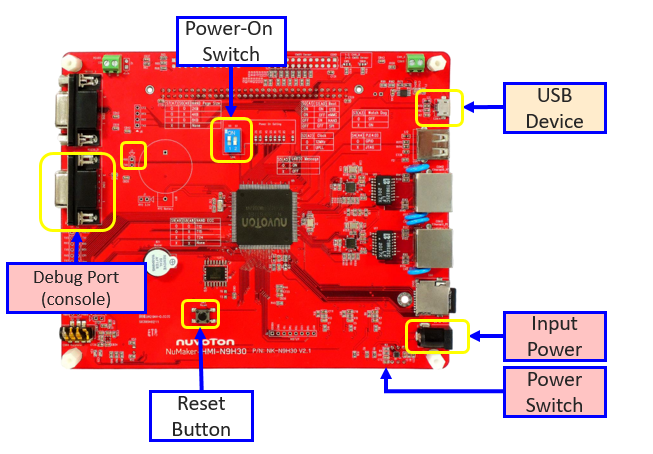
To program an image to N9H30 EVB, set the Power-o-setting to USB mode and connect it to the PC
S0 and S1 are High
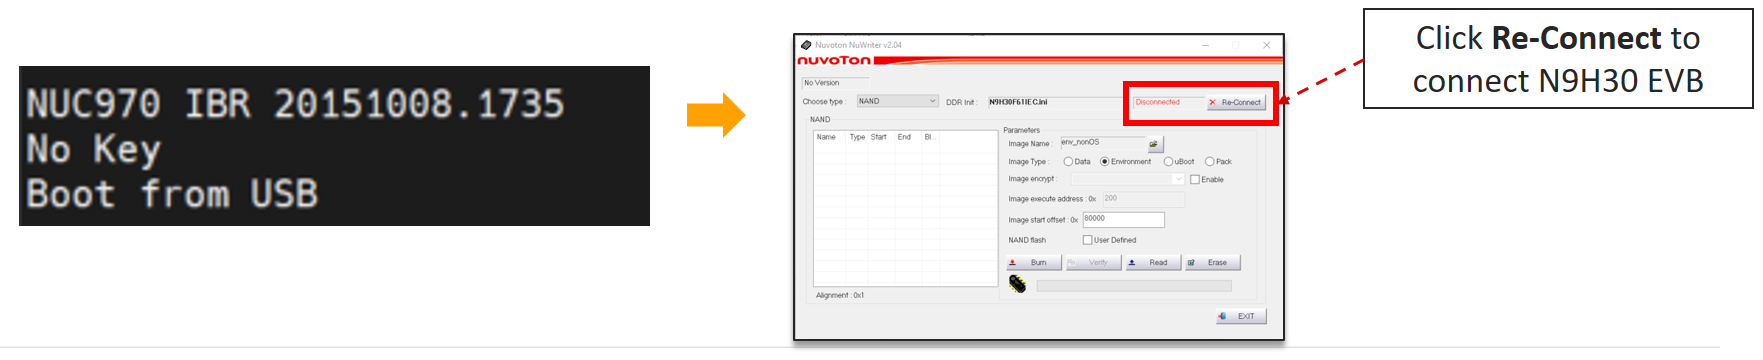
按下Reset後,在按tool的connect
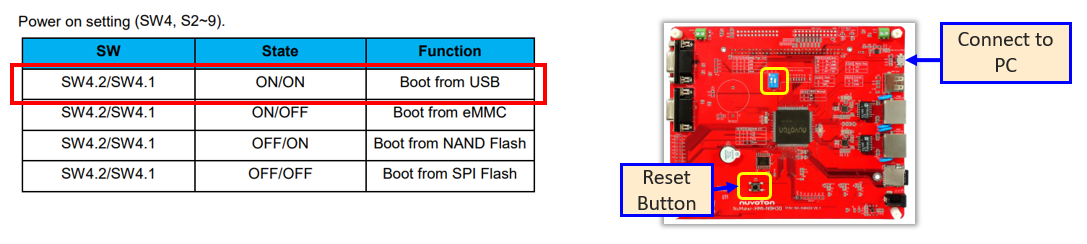
Click the Reset button and you will see the debug message: “Boot from USB”.
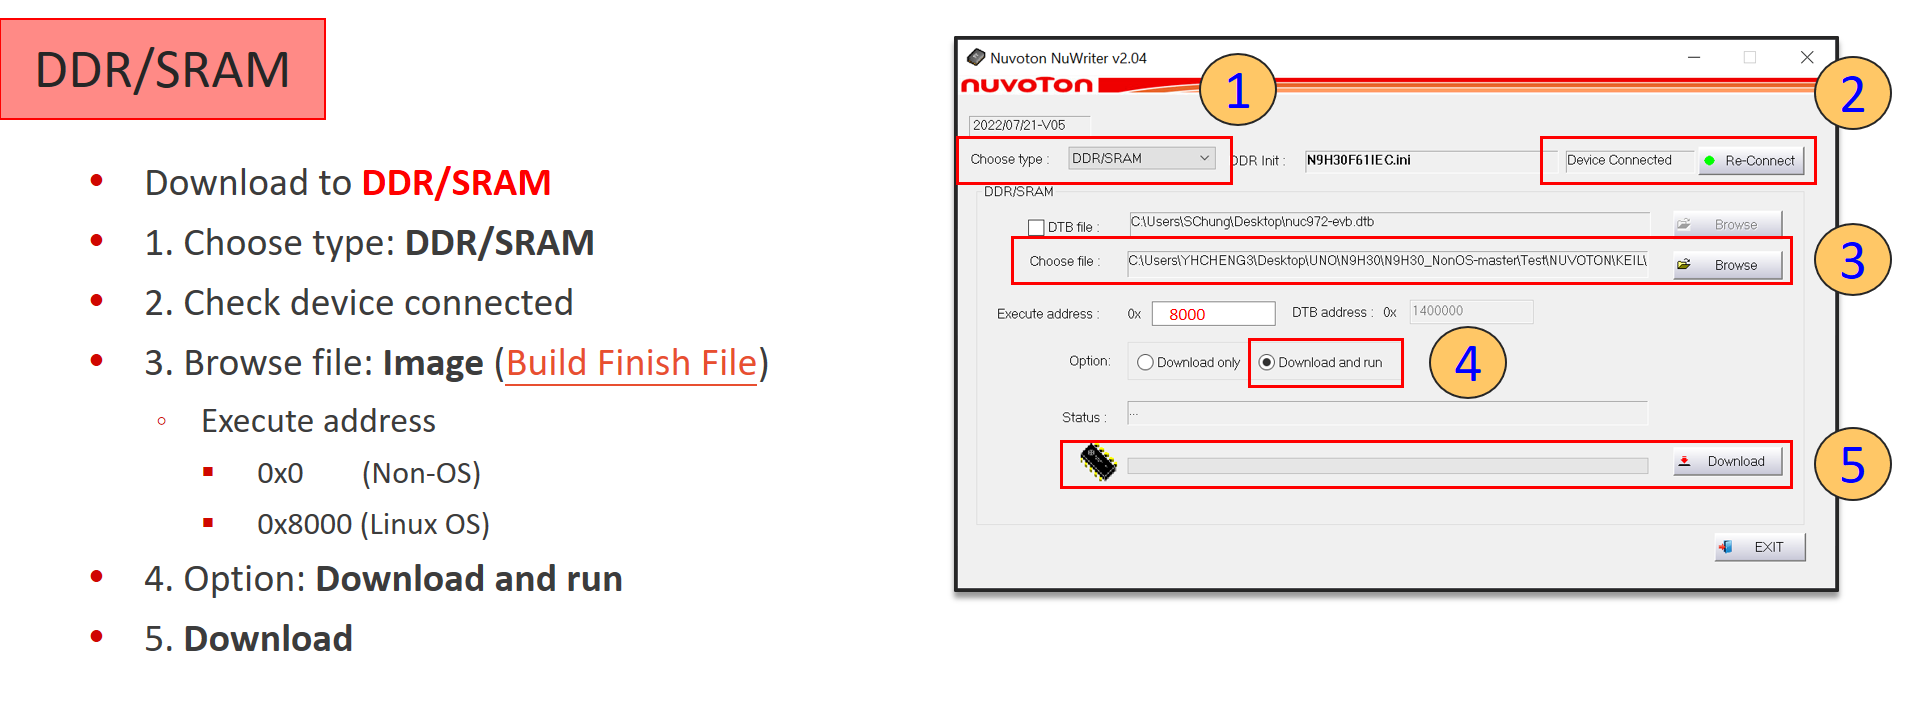
RAM:
DDR/SRAM : Non-permanent data storage for debugging
External storage :
NAND
SPI-Flash
Env.txt
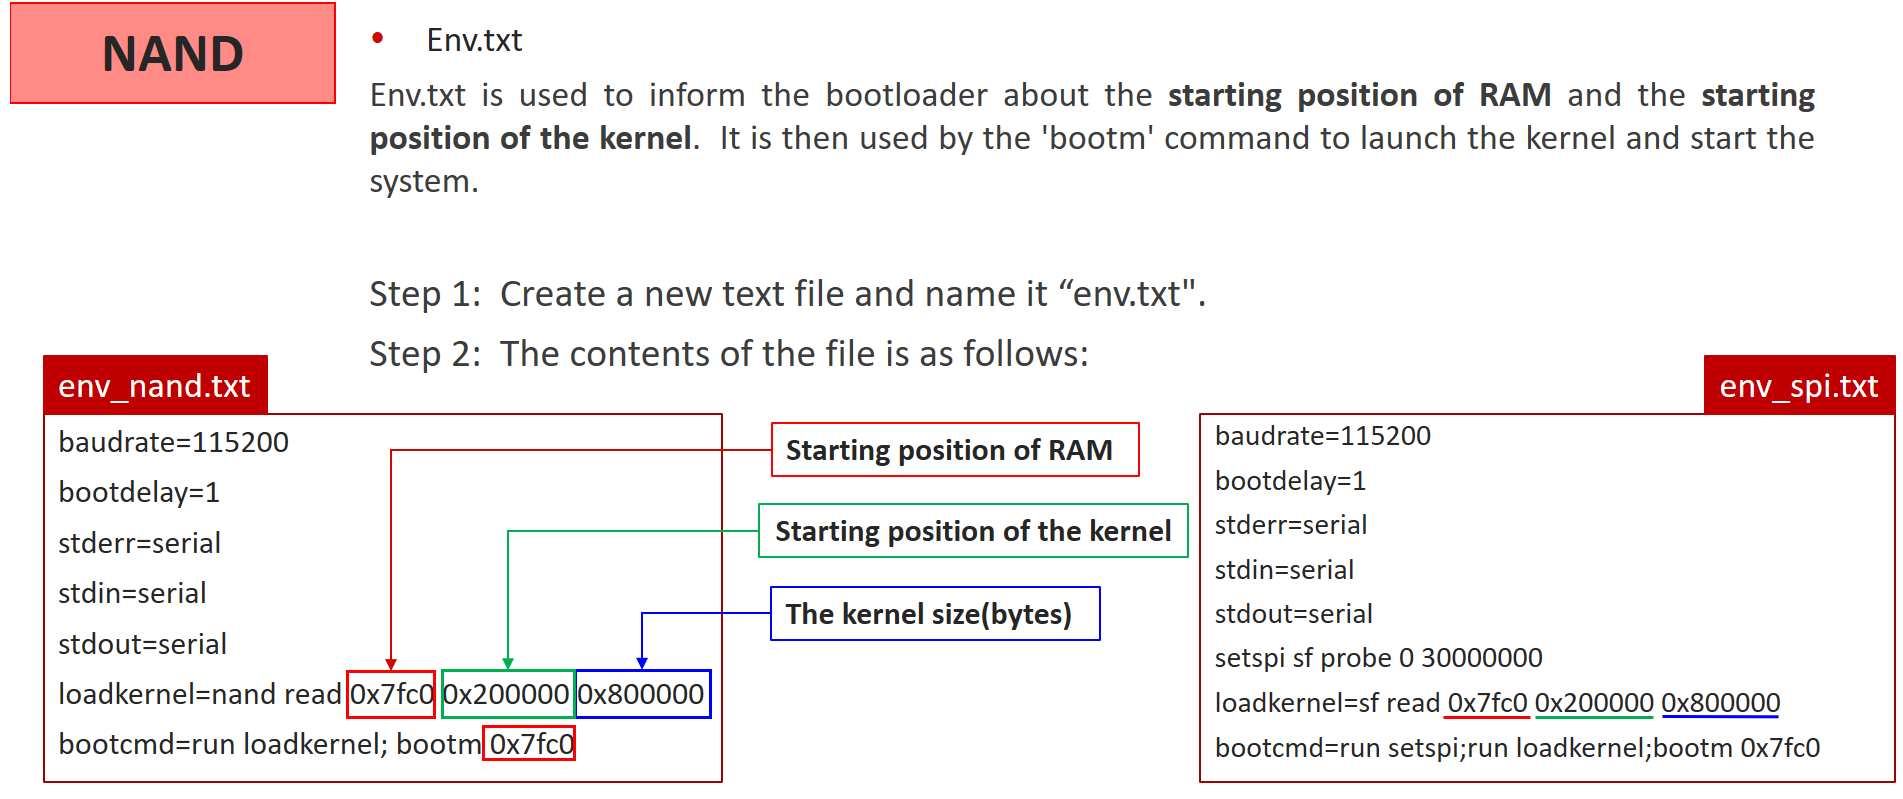
Kernel Size 重點說明
stderr=serial, stdin=serial, stdout=serial: 這些參數設置了標準輸入(stdin)、標準輸出(stdout)和標準錯誤(stderr)的輸出位置。
在這裡,它們都被設定為串列(serial)介面,這意味著系統將使用串列通訊埠來進行輸入和輸出。
loadkernel=nand read 0x7fc0 0x200000 0x800000: 此參數是一個自定義的指令,用於從 NAND 快閃記憶體中讀取核心映像並載入到記憶體中。
具體來說:
nand read: 這個指令表示從 NAND 快閃記憶體中讀取資料。
0x7fc0: 是載入核心映像的目標記憶體位址。
0x200000: 是從 NAND 記憶體中讀取資料的位址偏移量。
0x800000: 是要讀取的字節數(此處為 8MB)。
FILE SYSTEM
YAFFS
Create YAFFS Format Root Filesystem on NAND
1.1 Setting up the development enviromnet.
Please donwload the necessary package for development.
$ sudo apt install git make g++ python nucurses5-dev meas-common-dev libglu1-mesa-dev
Download the N9H30 Source code
$ git clone https://github.com/OpenNuvoton/NUC970_Buildroot.git NUC970_Buildroot_N9H30
1.2 Configuration options for the N9H30 system.
Setup default configuration of N9H30
$ make nuvoton_n9h30_emwin_defconfig
Build default image and related configurations.
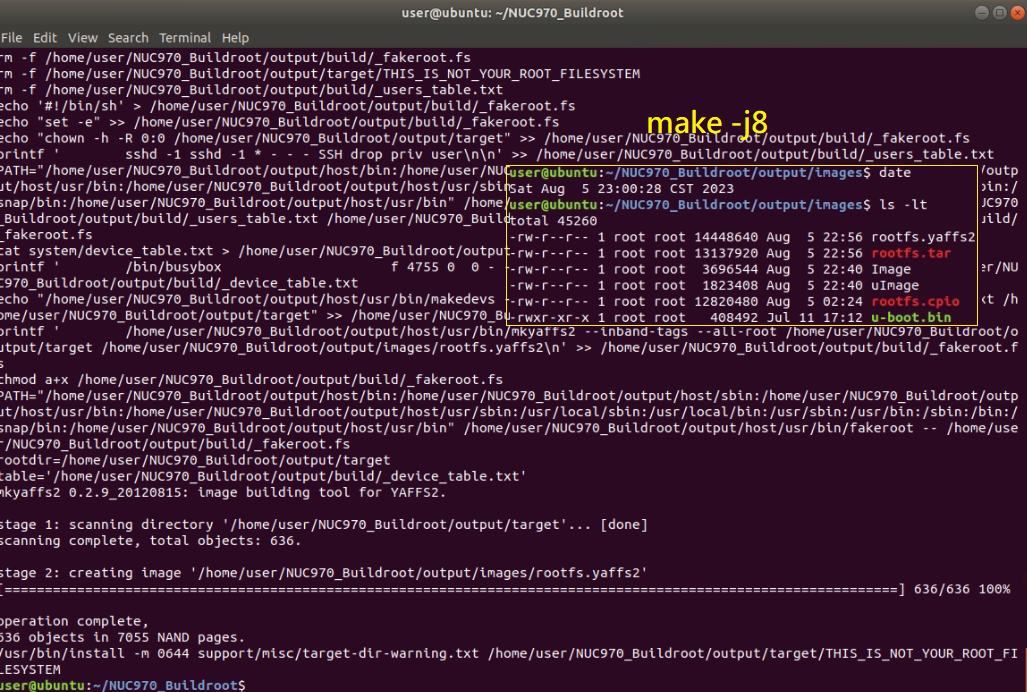
$ make -j8
1.3 Configuration options for NAND flash setting options.
Buildroot
$ make menuconfig
Linux kernal
$ make linux-menuconfig
$ make linux-rebuild
$ make -j8
Modify u-boot env.txt
env.txt is a u-boot environment variable file. u-boot can read data to RAM from Flash, boot kernel from RAM.
The variable bootcmd will be executed when u-boot starts and the variable bootdelay has been defined.
The following command will read the kernel image from Flash to RAM and boot from RAM address 7fc0.
env.txt 是一個 u-boot 環境變數文件。u-boot 可以從 Flash 讀取數據到 RAM,然後從 RAM 啟動內核。
當 u-boot 啟動並且已經定義了變數 bootdelay 時,變數 bootcmd 將被執行。
以下命令將從 Flash 讀取內核映像到 RAM,然後從 RAM 地址 0x7fc0 開始啟動
loadkernel=nand read 0x7fc0 0x200000 0x600000
bootcmd=run loadkernel;bootm 0x7fc0
u-boot can use MTD to partition Flash into three mtdblocks and create YAFFS2 format root filesystem on mtdblock2.
The Flash address and size below can be changed to anywhere you want.
u-boot 可以使用 MTD(Memory Technology Device)將 Flash 劃分為三個 mtdblocks(區塊),並在 mtdblock2 上創建 YAFFS2 格式的根文件系統。
下面的 Flash 地址和大小可以根據需要進行更改。
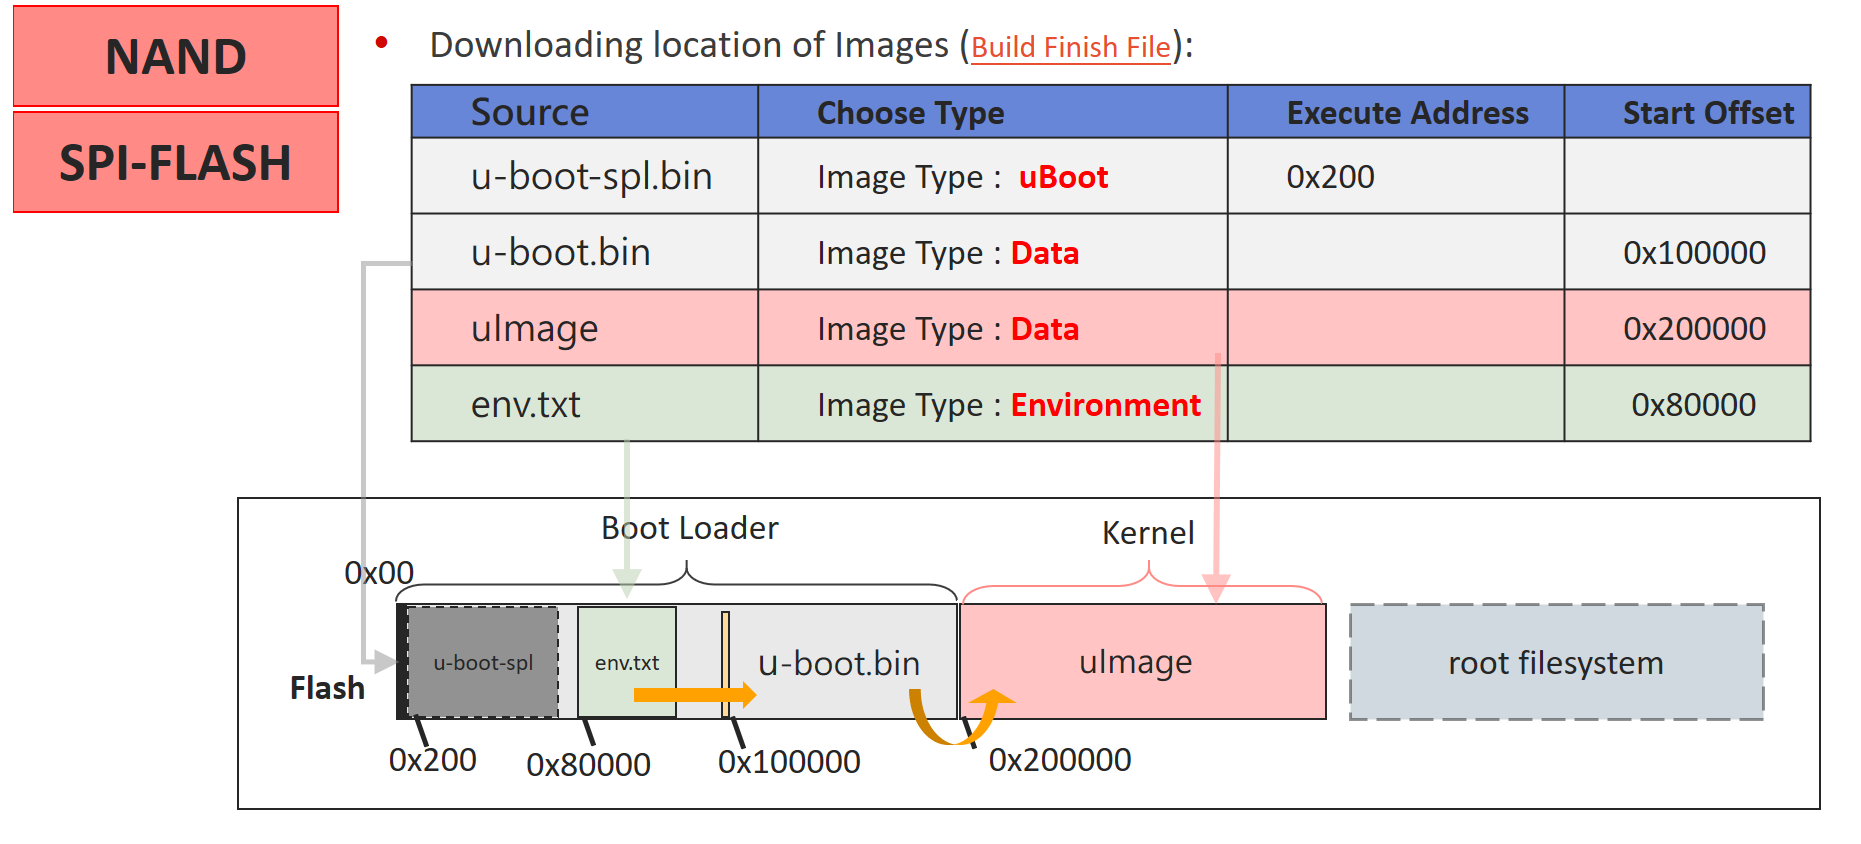
- mtdblock0 stores u-boot image and its Flash offset is from 0x0 to 0x200000.
- mtdblock1 stores kernel image and its Flash offset is from 0x200000 to 0x800000.
- mtdblock2 stores root filesystem image and its Flash offset is from 0x800000 to the end.
這些信息說明了 Flash 存儲中的三個 mtdblocks 的配置:
- mtdblock0 存儲 u-boot 映像,其 Flash 偏移從 0x0 到 0x200000。
- mtdblock1 存儲內核映像,其 Flash 偏移從 0x200000 到 0x800000。
- mtdblock2 存儲根文件系統映像,其 Flash 偏移從 0x800000 到 Flash 的結尾。 每個 mtdblock 都是 Flash 存儲中的一個連續區塊,用於存儲特定的數據,如 u-boot 映像、內核映像和根文件系統映像。Flash 偏移指的是 Flash 存儲中的起始位置,並以十六進制地址表示。
這種配置可讓 u-boot 和其他系統元件能夠輕鬆地從 Flash 存儲區讀取所需的映像,並在系統啟動過程中使用它們。這種分區和映像的組織方式有助於確保系統的順利運行,同時也方便了升級和維護。
The whole env.txt content is shown below:
baudrate=115200
bootdelay=1
stderr=serial
stdin=serial
stdout=serial
loadkernel=nand read 0x7fc0 0x200000 0x600000
bootcmd=run loadkernel;bootm 7fc0
bootargs=noinitrd root=/dev/mtdblock2 rootfstype=yaffs2 rootflags=inband-tags
console=ttyS0 rdinit=/sbin/init mem=64M
mtdparts=nand0:0x200000@0x0(u-boot),0x600000@0x200000(kernel),-(user) ignore_loglevel
Program Image to Evaluation Board
Program the following Image files to the target board. Each image has particular address and these addresses depend on
env.txt.
| Image Name | Image Type | Address |
|---|---|---|
| u-boot-spl.bin | uboot | 0x200 |
| env.txt | Env | 0x80000 |
| u-boot.bin | Data | 0x100000 |
| uImage | Data | 0x200000 |
| rootfs.yaffs2 | Data | 0x800000 |

Check Root Filesystem
Please enter the following command in the terminal of the N9H30 system.
# dmesg | grep yaffs
Kernel command line: noinitrd root=/dev/mtdblock2 rootfstype=yaffs2 rootflags=inband-tags console=ttyS0
rdinit=/sbin/init mem=64M
mtdparts=nand0:0x200000@0x0(u-boot),0x600000@0x200000(kernel),-(user) ignore_loglevel
yaffs: yaffs built Apr 6 2023 13:10:23 Installing.
yaffs: dev is 32505858 name is "mtdblock2" rw
yaffs: passed flags "inband-tags"
yaffs: yaffs: Attempting MTD mount of 31.2,"mtdblock2"
yaffs: block 957 is bad
yaffs: block 958 is bad
yaffs: block 959 is bad
yaffs: block 960 is bad
yaffs: 129 blocks to be sorted...
yaffs: yaffs_read_super: is_checkpointed 0
VFS: Mounted root (yaffs2 filesystem) on device 31:2.
FILE SYSTEM
JFFS2
Create JFFS2 Format Root Filesystem on NOR Flash
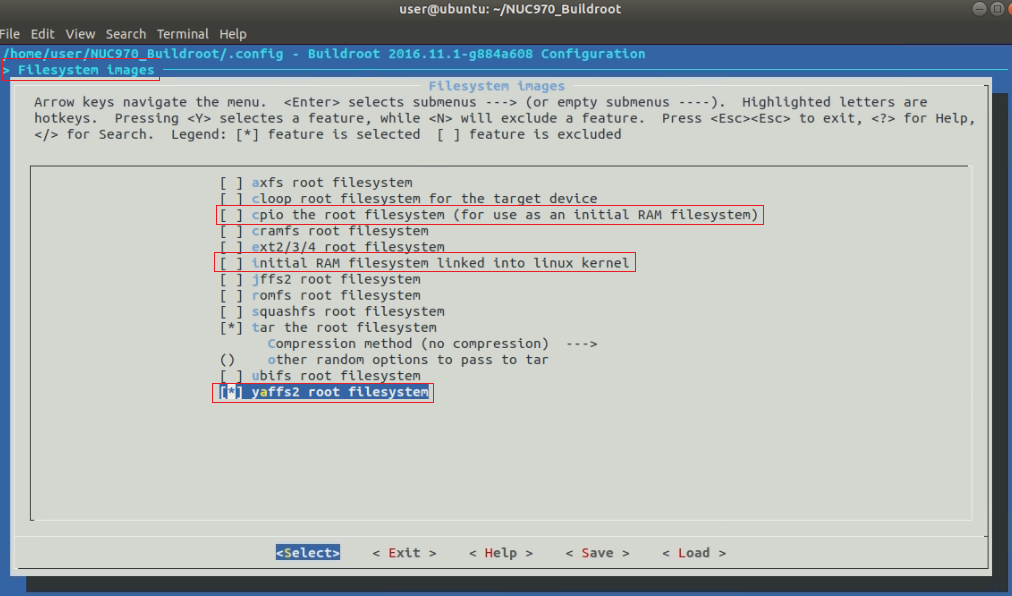
Modify Buildroot Configuration
Buildroot$ make menuconfig
-
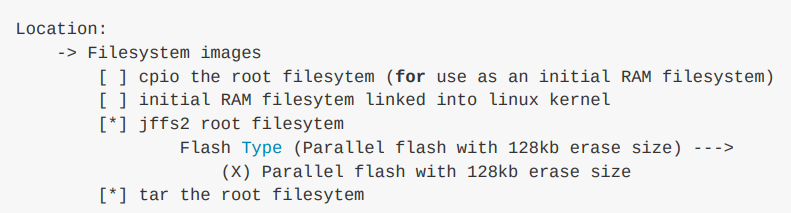
Cancel the default configuration that creates root file system on RAM.
Cancel cpio the root filesytem(for use as an initial RAM filesytem)
Cancel initial RAM filesytem linked into linux kernel
-
Use JFFS2 root filesytem.
-
Separate Linux kernel and root filesytem from uImage and tar the root filesystem with JFFS2 Format.
Choose Flash Type to Parallel Flash with 128KB erase size.
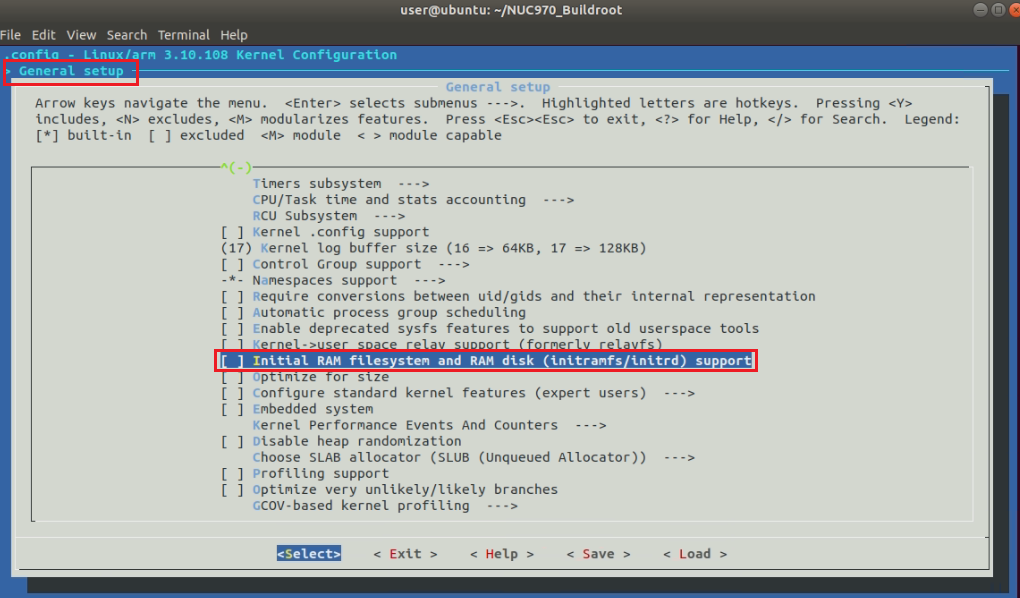
Modify Linux Kernel configuration
~Buildroot$ make linux-menuconfig
-
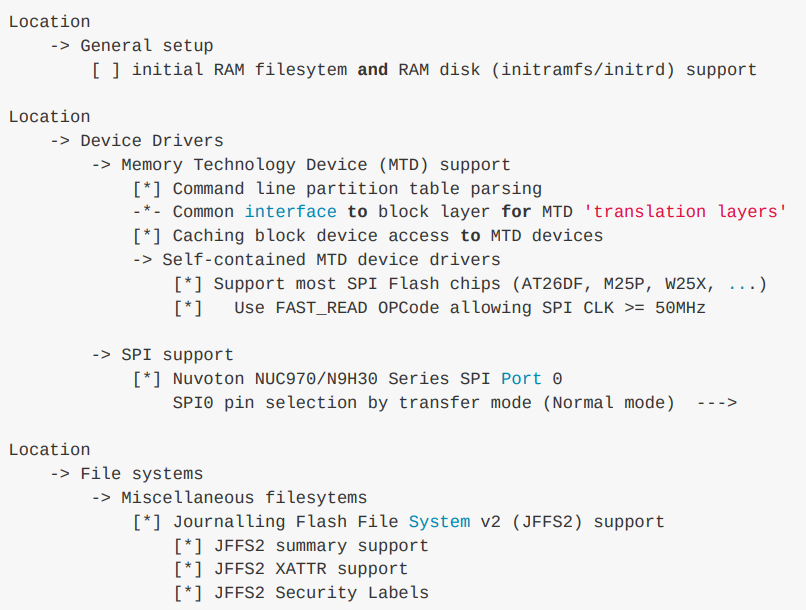
Cancel RAM filesystem and RAM disk support.
Cancel Initial RAM filesystem and RAM disk (initramfs/initrd) support.
-
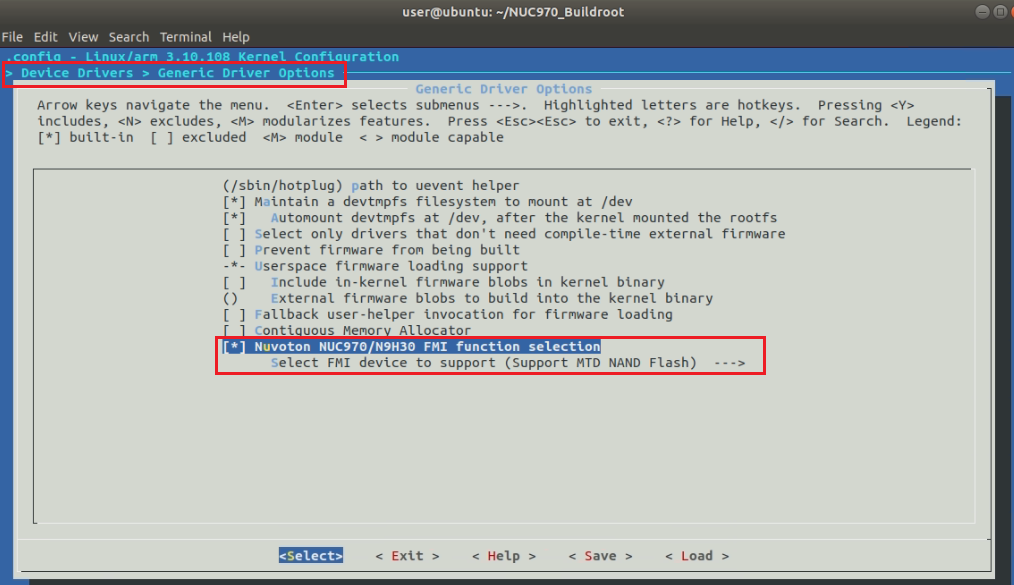
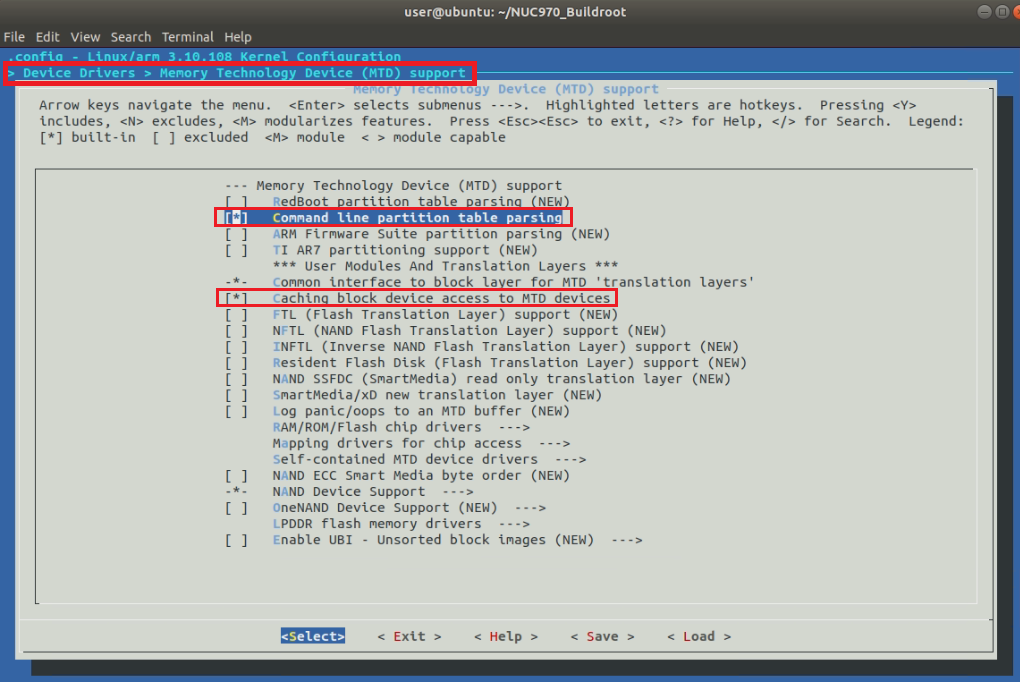
Use MTD partition command in u-boot.
Tick command line partition table parsing.
Tick caching block device access to MTD devices.
-
Use SPI support
Tick Nuvoton NUC970/N9H30 Series SPI Port 0.
-
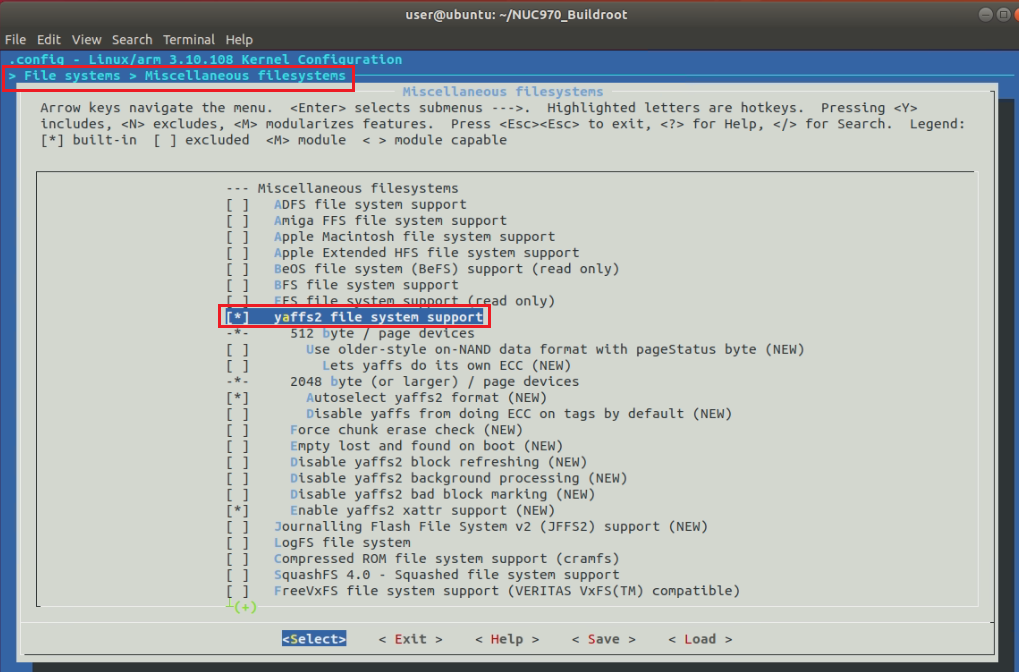
Ensure that Linux kernel supports JFFS2 format:
Tick Journalling Flash File System v2 (JFFS2) support to open JFSS2 options.
Tick JFFS2 summary support
Tick JFFS2 XATTR support
Tick JFFS2 Security Labels
Modify mtdblock Auto Mount
Some particular evaluation boards have “mdev” file determining which mtdblock will be auto mounted.
You can check if the path board/nuvoton/rootfs-xxx/etc has “mdev” file or not.
The default setting is auto mount mtdblock1 to mtdblock9.
In other words, it will mount u-boot and Linux kernel and will cause error.
To avoid this problem, modify “mdev” file with the following step. This demo is operated on
~Buildroot$ vim board/nuvoton/rootfs-xxx/etc/mdev.conf
Modify the source code below:
mtdblock([3-9]+) 0:0 660 */sbin/automount.sh $MDEV X${ACTION}
一些特定的評估板使用 “mdev” 文件來確定將自動掛載哪個 mtdblock。您可以檢查路徑 board/nuvoton/rootfs-xxx/etc 是否具有 “mdev” 文件。
默認設置是自動掛載 mtdblock1 到 mtdblock9。換句話說,這將掛載 u-boot 和 Linux 內核,並導致錯誤。
為了避免這個問題,請按照以下步驟修改 “mdev” 文件。
Modify JFFS2 Erase Size
The rootfs_jffs2 image cannot be directly programed into an evaluation board. Thus, you can use mkfs tool to generate jffs2.img.
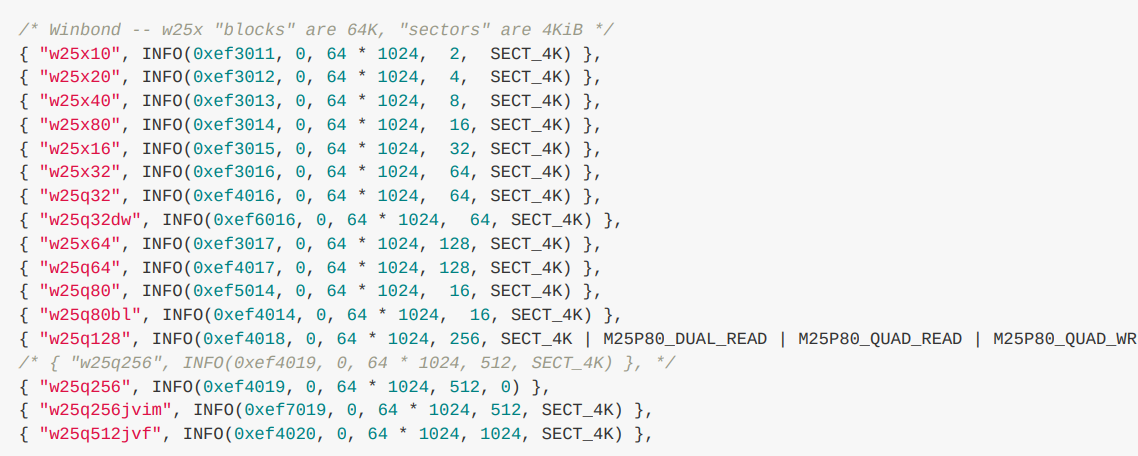
Because JFFS2 format needs the minimum erase size of 8k, you should modify setting in Linux driver.
Modify output/build/linux-master/drivers/mtd/devices/m25p80.c
/* Winbond -- w25x "blocks" are 64K, "sectors" are 4KiB */
{ "w25x10", INFO(0xef3011, 0, 64 * 1024, 2, SECT_4K) },
{ "w25x20", INFO(0xef3012, 0, 64 * 1024, 4, SECT_4K) },
{ "w25x40", INFO(0xef3013, 0, 64 * 1024, 8, SECT_4K) },
{ "w25x80", INFO(0xef3014, 0, 64 * 1024, 16, SECT_4K) },
{ "w25x16", INFO(0xef3015, 0, 64 * 1024, 32, SECT_4K) },
{ "w25x32", INFO(0xef3016, 0, 64 * 1024, 64, SECT_4K) },
{ "w25q32", INFO(0xef4016, 0, 64 * 1024, 64, SECT_4K) },
{ "w25q32dw", INFO(0xef6016, 0, 64 * 1024, 64, SECT_4K) },
{ "w25x64", INFO(0xef3017, 0, 64 * 1024, 128, SECT_4K) },
{ "w25q64", INFO(0xef4017, 0, 64 * 1024, 128, SECT_4K) },
{ "w25q80", INFO(0xef5014, 0, 64 * 1024, 16, SECT_4K) },
{ "w25q80bl", INFO(0xef4014, 0, 64 * 1024, 16, SECT_4K) },
{ "w25q128", INFO(0xef4018, 0, 64 * 1024, 256, SECT_4K | M25P80_DUAL_READ | M25P80_QUAD_READ | M25P80_QUAD_WRI
/* { "w25q256", INFO(0xef4019, 0, 64 * 1024, 512, SECT_4K) }, */
{ "w25q256", INFO(0xef4019, 0, 64 * 1024, 512, 0) },
{ "w25q256jvim", INFO(0xef7019, 0, 64 * 1024, 512, SECT_4K) },
{ "w25q512jvf", INFO(0xef4020, 0, 64 * 1024, 1024, SECT_4K) },
~Buildroot$ make linux-rebuild
Modify uboot configuration
Follw the steps below to modify Buildrot configuration.
~Buildroot$ cd output/build/uboot-master/
~Buildroot/output/build/uboot-master/$ make menuconfig
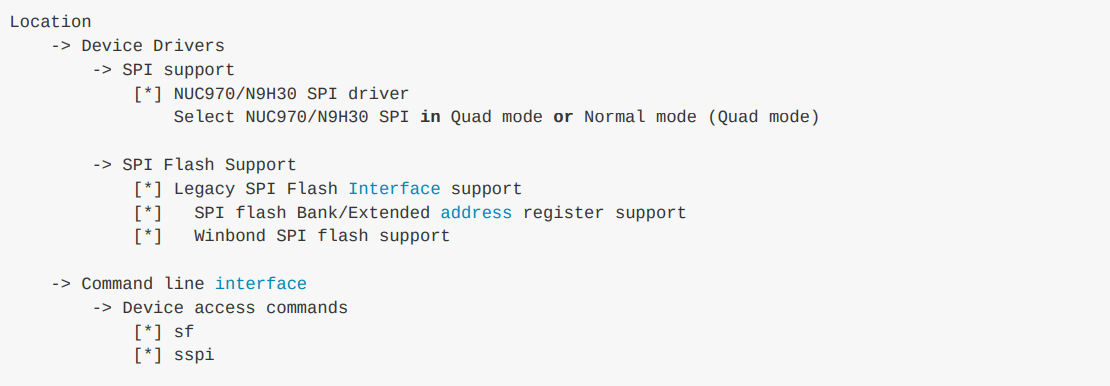
- Use SPI support
Tick NUC970/N9H30 SPI driver and select NUC970/N9H30 SPI in Quad mode
- Enable the legacy SPI flash support. This will include basic standard support for things like probing, read / write, and erasing through cmd_sf interface.
Tick SPI flash Bank/Extended address register support. This opetion is used to access the flash which has size > 16 MiB in 3-byte addresing.
Tick Winbond SPI flash. Because N9H30 evb just used Winboad flash.
- Device access commands
Tick sf command.
Tick sspi command.
Modify include/configs/nuc970_evb.h
#define CONFIG_SYS_USE_SPIFLASH
#define CONFIG_SYS_USE_NANDFLASH
/*#define CONFIG_ENV_IS_IN_NAND */
#define CONFIG_ENV_IS_IN_SPI_FLASH
/*#define CONFIG_ENV_IS_IN_MMC */
~Buildroot/output/build/uboot-master/$ cd -

~Buildroot$ make uboot-rebuild

~Buildroot$ make
Use mkfs Tool to Generate Root Filesystem Image
After installing successfully and compiling Linux kernel, go to Image folder. Create rootfs folder to unzip rootfs.tar.
~Buildroot$ cd output/images
~Buildroot/output/images$ mkdir rootfs
~Buildroot/output/images$ sudo tar -C ./rootfs -xf rootfs.tar
Use mkfs to generate jffs2.img
~Buildroot/output/images$ sudo mkfs.jffs2 -s 0x1000 -e 0x10000 -p 0x800000 -d ./rootfs -o jffs2.img
Modify u-boot env.txt
env.txt is a u-boot environment variable file. u-boot can read data to RAM from Flash, boot kernel from RAM.
The variable bootcmd will be executed when u-boot starts and the variable bootdelay has been defined.
The following command will read the kernel image from Flash to RAM and boot from RAM address 7fc0.
The difference of command between NAND Flash and NOR Flash is NAND Flash uses nand read and the NOR Flash uses sf read.
Sf probe should have been executed first because NOR Flash should be initiated first.
setspi=sf probe 0 30000000
loadkernel=sf read 7fc0 200000 600000
bootcmd=run setspi;loadkernel;bootm 7fc0;
u-boot can use MTD to partition Flash into three mtdblocks and create JFFS2 format root filesystem on mtdblock2.
The Flash address and size listed below can be changed to anywhere you want.
- mtdblock0 stores u-boot image and its Flash offset is from 0x0 to 0x200000.
- mtdblock1 stores kernel image and its Flash offset is from 0x200000 to 0x800000.
- mtdblock2 stores root filesystem image and its Flash offset is from 0x800000 to the end.
The whole env.txt content is shown below:
baudrate=115200
bootdelay=1
stderr=serial
stdin=serial
stdout=serial
setspi=sf probe 0 30000000;
loadkernel=sf read 7fc0 200000 600000
bootcmd=run setspi;run loadkernel;bootm 7fc0;
bootargs=noinitrd root=/dev/mtdblock2 rw rootfstype=jffs2 console=ttyS0 rdinit=/sbin/init mem=32M
mtdparts=m25p80:0x200000@0x0(u-boot),0x600000@0x200000(kernel),-(user) ignore_loglevel
Program Image to Evaluation Board
Program the following Image files to the target board. Each image has particular address and these addresses depend on
env.txt.
| Image Name | Image Type | Address |
|---|---|---|
| u-boot.bin | Loarder | 0xe00000 |
| env.txt | Env | 0x80000 |
| uImage | Data | 0x200000 |
| jffs2.img | Data | 0x800000 |
Check Root Filesystem
Type the following command on device terminal to check if the root filesystem has been mounted on or not.
Compare the MTD partition you defined in env.txt with the message after you type the command below.
/ # cat /proc/mtd
dev: size erasesize name
mtd0: 00200000 00010000 "u-boot"
mtd1: 00600000 00010000 "kernel"
mtd2: 01800000 00010000 "user"